
Previous post

Next post


I don’t have a lot of memories with my grandpas because both of them passed away when I was small, but I think the photos I have of them are why I didn’t need a lot of convincing to add a chore jacket to my sewing projects list. A chore jacket just seems like a grandpa uniform. I don’t remember what exactly made the Julien Chore Jacket stand out over the many other chore jacket patterns – the Ilford jacket and a Japanese mens’ jacket were also in the running.
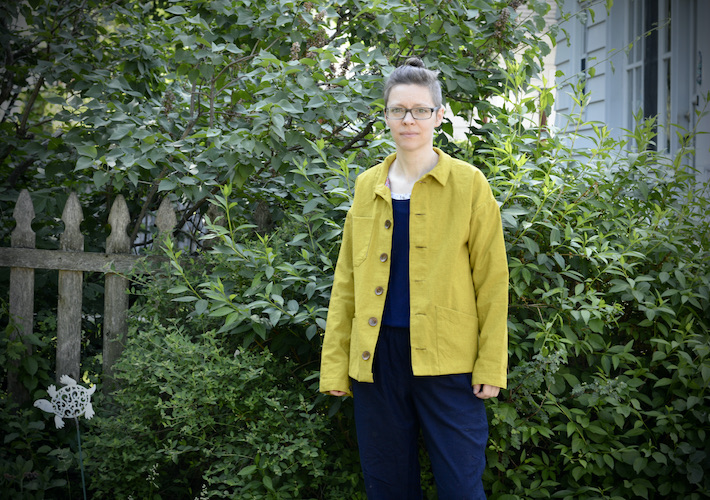
I picked a luminous chartreuse linen for the outer fabric (warp and weft are an electric yellow-green and a rich gold), and picked a batik cotton from my stash for a lining. I wanted a lining so it could be a three-season jacket.
I cut the pattern in size 37, which is the only size that matched more than one of my measurements, which placed me across sizes 36-40. I lengthened the sleeves by 1/2 an inch, and shortened the pattern by two inches. I eliminated the fake back vent from the lining, and did a high round back adjustment on the back pieces.
I debated adding a forward shoulder, but last time I did both the forward shoulder and high round back, my shoulder seams were actually too far forward, and I decided the hunch back was a more important concession than the shoulder slouch. I lined the pockets with cotton. I used interfacing for the button placket as instructed. I interlined the collar and the cuffs with a single layer of medium weight linen (because I couldn’t find the rest of my interfacing). That isn’t called for in the pattern, but I wanted to make sure my cuffs and collars held up and had enough structure.
For the most part, the instructions and finishes were very thoughtful. There were a couple of things that seemed a little weird, like serging one place and french seaming elsewhere. It felt like there should have been some middle ground between those two options… but to me, that would be handsewing, which is understandably a turn-off for many sewists (including my former self.) I skipped some of the top stitching in favor of hand stitching the outside to the lining. I flat felled and whipped down the armcye seams. I eliminated the topstitching on the sleeves because I knew the thickness would mean tension issues and the tight quarters in the sleeve would be a nightmare and probably wouldn’t look nice.
 In order to avoid having Urkel pockets, I shortened the lower pockets by two inches. That wasn’t the best move. The hem eats up 1.6 inches/40 mm of the pocket fabric. I made the hems narrower in order not to make the pockets as stumpy (my hems used about 1 1/8 in), so the jacket wasn’t as shortened as I intended when I took two inches off of the body of the jacket. I wish I would have left the pockets at their original length. Then, if I’d had placement or length issues, it would be easy to fix.
 I love the cuffs. They have a longer tab on one side for the buttonhole that is a really nice detail. Instead of top stitching the split above the cuff, I finished it the historical way, with a little triangle of fabric at the top of the inside of the opening for reinforcement.
After a few wears, it was clear the slit in the sleeve needs to be longer so I could properly roll up the sleeves – the photo in this post with the sleeves rolled is as far as they would go with the split as is. For messy work, that’s not high enough.
I was sure that lengthening the opening the “right” way meant adding a sleeve placket, which would involve tracing and cutting placket pieces from another pattern, and learning how to install one.
Truly, sometimes the best answer is the easiest one. One day, I took my sewing supplies with me to a kids’ doctor appointment, and seam ripped the sleeves open an extra two inches. I hemmed them up to the end of the new opening, put the triangle reinforcements back on, and problem solved. Here’s what they look like now: I did the buttonholes by hand, because I didn’t have enough matching thread to do it by machine. I did have olive sashiko thread in my stash which was perfect for handstitched buttonholes.
 I realized the issues I had with my buttonholes on previous projects were due to the thickness of the fabric rather than my skills. I got really nice results on this project, because I was working with a thinner button placket.
  I used 1-inch wooden buttons I got in a bulk bag from the internet. I sewed them on loosely, and then wound thread around underneath the button to tighten the stitches and raise the button above the fabric so it would rest nicely on top of the buttonhole. This required mindfulness; loose stitching is against my nature. I had to redo several buttonholes along the way before I got into a rhythm.
I used rainbow bobbin thread for parts of the project to make sure I had enough matching thread for the top stitching, and then had tension problems so the rainbow thread peeks through here and there. My goals around sewing are to embrace what is, and to shake off the deer in the headlights perfectionism. This project was a good move in that direction. One thing I wish I had remembered was to include a loop of fabric under the collar for hanging the coat (like the one on my Forager Vest). It looks like it belongs on a hook by a door or on the wall on the way down basement stairs, waiting for a worker to swing it from its place and onto their shoulders on the way off toward chores or a job.
If I did the project again, I might have finished the hem with a facing, or a band of self fabric, and it could easily have been shortened another couple of inches. Even so, I like the results, and I especially like that this linen and cotton number will be easy to mend, and will get softer and softer with each wash.
In the photos, I’m wearing my Julien with Luna pants in silk noil, which you can see in a history bounding outfit in this post, along with construction/alteration notes, and a Gemma tank, both by Made by Rae. The top photo is my paternal grandad, and the bottom is my maternal grandpa.
The jacket is beautiful and the photographs of the grandfathers make me miss two wonderful men!
Thank you. I wish I had gotten to know my grandpas better. I’m glad my own kids have had an opportunity to get to know both of their grandfathers.

2 Comments