
Previous post

Next post


Back at the beginning of April, I was starting to feel hopeful about sewing again and I mentioned that I had a couple of patterns I wanted to make.
At that point, I hadn’t started sewing yet. The three items I was planning to make were an Elizabethan Sea Dogs jerkin, a pair of Luna pants, and a Remy raglan. The original plan was a sort of monochromatic history bounding look that would mix and match with the rest of my wardrobe.
I did make three items. It didn’t go exactly how I planned, but I’m happy with the results. I’m not sure if I’m capable of making three black items in a row per the original plan, but I set a record for making three neutral items in a row, so that’s something.
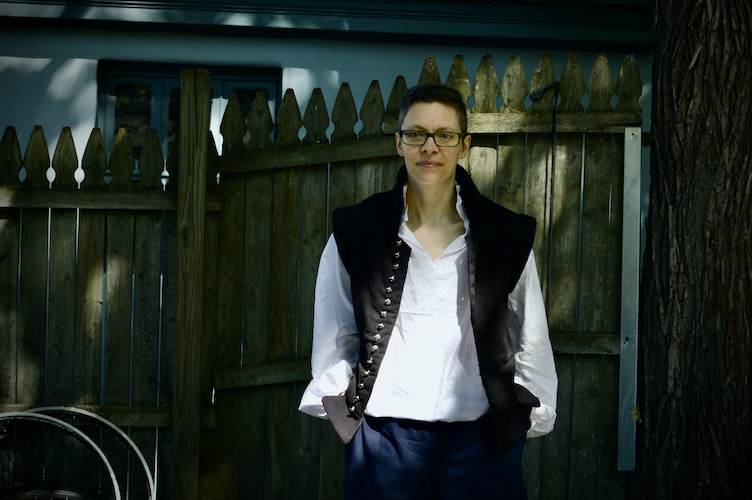
First, I made an Elizabethan jerkin, from Reconstructing History 210. I made smaller versions for my little boys last fall. For mine, I made the 34″ chest size, which is the smallest size. The number matches my bust measurement, but I’m not built like a dude, so there was a lot of extra fabric with my first draft.
I took it in at the side seams (1″ seam allowance on each side), and around the shoulder and armcye to get a better fit. I didn’t want it to be too fitted because the historical way of wearing a jerkin is over a doublet, which is basically a jerkin with sleeves. The jerkin needed to be spacious enough to fit on top of the doublet I’m going to make someday.
I used a soft, thin khadi shot cotton as a muslin, which then became the lining. I used a thicker black khadi cotton for the outer layer, and interlined it with cotton batting for warmth.  I originally planned to do button and loop closure in the front, but went for traditional button and buttonhole after doing a little internet research on Elizabethan jerkins. That meant fifteen hand finished buttonholes, which wasn’t as bad as I thought. I started at the bottom with the hopes that I would get better at it as I went along.
I’m not good at buttonholes yet, and 15 buttonholes didn’t change that. After the first three or so, I got marginally better, but the rest basically all look the same. They aren’t amazing. Fortunately, they are black thread on black fabric, so it doesn’t really show.
If I could do it again, I would have interlined at least the front two panels with something stiffer in addition to the cotton batting, to give some support and structure to the front, especially because of the buttons. I used reproduction buttons from The Tudor Taylor. Pewter buttons are heavy. The lightweight layers of the jerkin weren’t strong enough to hold them up.
I didn’t want to take the whole thing apart, so I whipped down a double layer strip of thick linen on the inside edge of the button side of the jerkin, on top of the lining. That provided enough structure to make it work. I didn’t line the tabs around the bottom of the jerkin with batting, to keep them from being too bulky. This was a good move. The collar, I added an interlining of canvas to keep it stiff enough to stand on its own. It’s done a decent job of staying vertical, but I could have stood to further stiffen the inner layers. Even just as it is, though, the collar is like a cozy little holding area for your neck.
Due to the general lack of structure from the soft batting and fabrics, I may gradually embroider or quilt the jerkin. For that, I would have to either learn some traditional embroidery based on a pattern that would have been used at the time (and probably wouldn’t finish it for a very long time) or use the Sashiko stitches I already know how to do, which would make it more historically inaccurate (and also take forever), but would make it a contemporary art form. So many decisions. It might be a good project to come back to in the fall when it starts to get cold again.
Luna pants. I’ve had this pattern forever. I’ve also had navy silk noil yardage for a very long time. Meg McElwee of Sew Liberated had a sweet pair of dark blue Arenite pants in silk noil, and I wanted a pair. I already had a bunch of Arenite pants, though, and Meg already had a pair of blue silk noil Arenites. There didn’t really need to be two of those in the world because of me. So I made Lunas with the silk noil. Based on my measurements, I went with a size small. I was too impatient to fully read the sizing instructions in my eagerness to get started. This may have worked in my favor, because I wouldn’t want to change anything about the rise or the fit at the top of my legs/around my waist. The legs, especially the thigh area, had a lot more ease than I wanted, though.
To adjust the fit, I used french seams for the inner leg seams, and when I sewed the first seam wrong sides together, I started the top of the crotch at a quarter inch, and graded out to about 5/8 of an inch through the thigh, and then tapered back to about a quarter inch by the time I got down through the lower calf and ankle. Then I trimmed the seam down to a scant quarter inch, and finished the french seam with a generous quarter inch seam.
I mostly followed the instructions, but I used 1.5 in. elastic at the waist and cuffs, since that’s what I had (The pattern calls for 1 inch elastic). I used a quarter-inch seam allowance at the top and bottom of the waistband facing, and generously folded the waistband over after understitching. At the waist, to stabilize the elastic, I sewed a long stitch through the center of the elastic all the way around, stretching it flat as I went, similar to the instructions for the Arenite waistband.
 For the cuffs, I folded them over a quarter inch, then formed a 1 7/8 inch casing. Initially, I was worried about shortening the pants by using the wider elastic at the cuffs, but they were designed with enough vertical ease that the length is perfect for me with the wide cuffs. My legs are on the shorter side, while my torso is long (another reason I need to keep my pants from being too baggy).
I flat felled the outer leg seams by hand, and used snug hug seam binding tape for the pockets. I bar tacked the top and bottom of the pockets because I know I’d rip them if they weren’t reinforced (Ok, fine, I only did it on the left side, because I’m left handed. I’ll go back and fix it, but I’m trying to focus more on getting things done than on perfection). I like the way the pockets are finished for minimal bulk, but still very functional.
(I did go back and secure the right side pocket, using navy sashiko thread and some decorative stitching. There is something nice about having purposely assymetrical details on your clothing because you made it yourself.)
I particularly like that while this pattern has plenty of ease and an elastic waist, it manages not to be bulky or weird around the crotch, which I truly appreciate. I love the chunky cuffs, and the silk noil has a nice drape and cozy feel, but it still has heft to it. Many times when I make pants, I’m afraid to go about my life in them – kneeling on the floor, etc. – but these feel like they can stand up to that kind of everyday movement.
Instead of making the Remy top, I made a 16th c. pirate shirt out of white handkerchief linen, with ruffles at the cuffs and collar. As I was planning my sewing, I couldn’t decide which fabric to use for the Remy top. You kind of have to make 16th century pirate shirts out of white linen, which made it seem like the easier choice. The pirate shirt would work as a shift for historical costuming, as well as serve for history bounding, so I decided to put the Remy on hold until I could be more decisive about the fabric choice. I machine seamed the long seams of the shirt, and hand finished it. I reinforced the side seams and the neck opening with little pieces of fabric, following the technique I learned from Folkwear Patterns Victorian Shirt.
I used several resources for cutting and assembly, but generally followed the instructions from the Woodrunner’s Diary, sized down for my measurements. Here’s another great post with a Tudor ruffle shirt with great styling (and a cod piece, which always makes me smile).
The wonderful thing about menswear is that fashion changes way slower for mens’ clothing than it does for women, even historically, so my shirt could potentially stretch across a couple of centuries if I’m being generous with my interpretation. (You can see it in a 16th/17th/18th c. mashup historical costume here.) The cuffs have little handbound holes on each side which tie with twill tape, or can be untied and rolled for a pirate who needs to do one’s chores. (Click here for a great resource showing lots of different cuffs from period paintings.)
This didn’t end up being the all-black ensemble I first imagined, but it does go together for a kind of CW prince vibe, and I’m inspired to try the three-patterns-at-a-time goal to give myself manageable sewing plans, rather than looking at the fabric and patterns as a whole and getting overwhelmed.
The Remy top is still in the running for the next batch of three, as is a pair of Chandler trousers, and the Julien Chore Coat. Other contenders are the Wildwood Wrap Dress, and a pair of under-bust stays to finally solve my problem of what to wear under my Vermeer Milkmaid costume, which has been paused due to underpinning-related indecision.
My 8-year-old daughter has requested a jerkin (she likes the silver buttons), the Chaplain has requested a pirate shirt similar to mine, and my 12-year-old daughter is hoping for a red linen pair of Free Range Slacks with sashiko details like my pair. My 14-year-old daughter needs shorts, which she said, “you could make.” My plan is to reserve the month of May (which usually bleeds into June) for my own sewing, and then branch back out into the rest of the fam, to update and expand our family historical wardrobe and make a few everyday items people have requested. I won’t even start on the mends – I do them whenever I can, but the pile never seems to get smaller.
In spite of the overwhelm, it feels good to be sewing again.


