
Previous post

Next post


For my first attempt at making pants for myself, I made Arenite Pants from Meg of Sew Liberated. The pants have a ton of ease and lots of options in terms of style and fabric choice, so the five pairs I made from the same pattern and size feel very different from each other.
Sew Liberated’s Arenite pants had directions that were much more clear for a hobby sewist than the other couple of (older) patterns I’ve made from Meg’s shop. In the pants pattern, she explains techniques and explains the “why.” When you have enough knowledge to be self-assured, not knowing the why can make for dangerous sewing – I see an instruction and think, I know a better way! Only to find out there was a very good reason for doing it the way its described in the instructions.
For all the versions I made, I used less fabric than called for. The pattern lists for 3 2/3 to 4 1/8 yards depending on the width of the fabric. I started out with more fabric than I needed because the site where I purchased my fabric only allowed me to purchase in half yard increments. I used about 2 and a half yards per pair. I may have used 2 3/4 yds for my 44″ wide fabric. Since there are three pattern pieces per leg, it was easy to move them around like puzzle pieces to find the best way to cut them to save fabric. Here are my pattern pieces laid out on 52″ fabric: For the first four pairs, the waistband piece was a bit short. I finished the crotch seam with a French seam and that may have changed the overall dimensions of the pants. It might be due to the stretch factor of the fabric, or because I traced the pattern using a piece of regular chalk, which wouldn’t win any awards for accuracy.
I grafted a piece of fabric onto my first waistband to make it long enough, which is basically unnoticeable now that the waist is gathered. For subsequent pants, I just added 1/2-3/4 of an inch of length to the folded waistband piece, measured it to my finished waist opening when the pants were pieced together, and then cut any excess I ended up with.
Version 1: Black Brussels Washer Linen/Rayon blend. Hemmed version, size 6, no mods.
Here is the pocket detail:

Version 2: Blue Brussels Washer Linen/Rayon blend. Hemmed version, size 6. Contrasting red/orange shot cotton lining the hems, inside of waistband, and pockets.
In the photo below, the pants are rolled twice at the hem and have been worn for two days. This included two dance recitals in one day, which involved a lot of sitting alternating with running for costume changes. They look pretty rumpled here. It was my second attempt to photograph them and dang it, I have a life and I’m not trying again. Besides, I’ve heard letting linen rumple adds to its charm. Pocket detail:
 Version 3: Grey Tie Dye Rayon. Woven cuffed version, size 6. Contrasting voile pocket lining, tucked pockets in closer to body of pant. Lengthened pant leg slightly, maybe 1/2 an inch.
 Pocket detail:
(I ended up giving this pair to my oldest daughter, who is 12. I just didn’t like the light grey color. She got an oil stain on them, so I used RIT dye to turn them a washed burgundy. You can see the color in this post.)
Version 4: Black Tie Dye Rayon. Woven cuffed version, size 6. Contrasting lightweight cotton pocket lining. Lengthened leg 1.5 inches, lengthened back rise. I wish I hadn’t used a different pattern for the pocket on my black rayon pair; even though it’s just a graphic black with white print, it’s distracting and I would have preferred a monochrome look for these pants.
  I may use fabric paint to make the whole pocket black, or at least darken the white to grey, but that seems like a lot of work for the inside of a pocket. (Update: I actually went back and painted the pockets with a black acrylic paint wash with a fabric additive. It made the pockets a little crunchy but they are much lower profile. Perfectionism strikes again.)
Otherwise: I LOVE how they turned out. They are smashingly comfortable but still look fancy since they are made of rayon and have the flat fell stitching down the pant legs.
Doing the elasticized cuff on the rayon pairs was a pain in the buns! But it turned out so well that it was worth it. I plan to keep wearing them even when joggers aren’t “in” anymore.
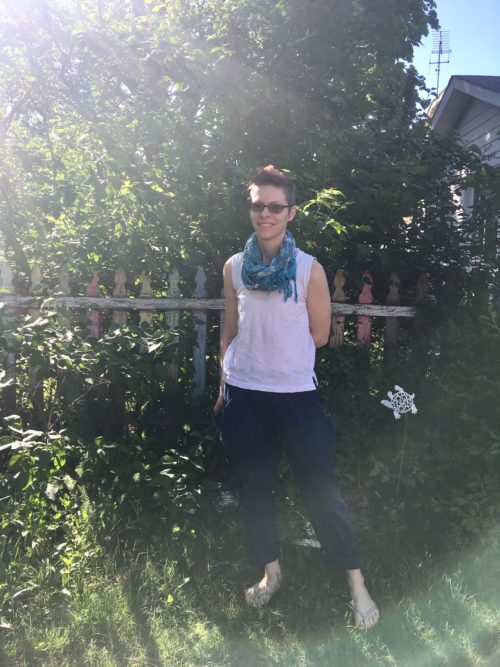
Version 5: Indian khadi cotton. Hemmed version, size 6. Graded the legs in about a quarter inch at the bottom on the side panel. Tucked the front crotch in by about a 1/2 inch (removing an inch of ease), grading up to the waistband and down to the crotch. This pair was really crunchy/starchy; I threw it in the dryer with a bunch of tennis balls for one cycle and that was all it took to loosen them up. (They were photographed after a full day of wear and aren’t even that wrinkled! This version exceeded my expectations. You can see the below shirt and the others I made from the Strata top pattern in this post. Also, my kid cut my legs off!) Like the khadi cotton version, my linen blend pants were also pretty crispy, so I soaked them in a baking soda solution for 24 hours. I used a huge plastic tote in the upstairs tub, added 3/4 cup baking soda, and filled until the clothes were covered with water. Then, I threw them in the dryer with every dryer ball and tennis ball I own to soften them up. They were noticeably softer after that.
My linen blend pants were the first two pairs I made. With both, I used my waist to measure the Dritz Soft Waistband Elastic as instructed. The elastic is has so much give that it needs to be tighter than you think in order to hold the pants up. What felt like the right length when sizing the elastic ended up being too loose in the finished pants. I ended up having to rip out several inches of the back in both the first two versions in order to take the elastic in an inch or two. Because of that, there is more gather in the back section than there is around the rest of the waistband. I used the finished elastic in those pants to figure out the length to use for my other pairs.
The thing about making your own clothes is when you make mistakes, you are hyper-aware of every imperfection. With the waistband adjustment, the pants fit much better now (although on the second wear, the black pants were pretty loose at the end of the day). I’m not sure I’d want to pick out the whole waistband or even half of it to further reduce the waist and distribute the gather better. I’m wary of doing anything else to the black linen pants since I love them – I don’t want to do anything that would risk further weakening the fabric or tearing holes (with the loose weave of the linen, it’s REALLY easy to catch the fabric when you’re seam ripping).
After I finished the black pants, I noticed a pull in the fabric right on the seat of the pants. It wasn’t a hole, but the loose thread, if removed, would leave a bald patch that would certainly develop into a hole. The pulled thread was a blazing half an inch long (And I complain when other people are overly dramatic).
As I often do when I discover something like that, I didn’t think, I acted. I trimmed the thread and sealed the area with fabric glue, which left a whitish residue. I dabbed the residue with vinegar with little effect. Then I ironed a black fusible patch to the inside of the pants to prevent further breakdown.
I’m not 100% if this issue is a flaw in the fabric or if I caught a bit of the fabric when ripping a seam. The part that was damaged wasn’t close to a seam , but I didn’t want to rule out human error on my end. Brussels Washer, the fabric, was pretty much universally recommended on the internet – everyone loved its drape and ability to avoid wrinkles while looking like linen. No one mentioned its loose weave.
After I applied glue and a patch to my bald spot, I tried using a black Sharpie to tone down the whitish blur where the fabric glue was. It turned a metallic coppery tone instead of black, so I tried to remove the Sharpie by blotting it with alcohol. Then I did sashiko-style stitching in black thread over the spot. It’s now at a point I can live with, and I’m hoping since it’s black, that no one else will notice.  After I wore the black pants the second time, they stretched out to the point that like the khadi cotton pair I made, the front crotch was noticeably baggy. I sewed down that center seam, grading out to a max of 3/4 of an inch the whole way down the seam and matching the seam back to what was called for at the crotch, removing about 1 1/2 in. of ease from the front of the pants. Even with that much removed, they are still very roomy, but no longer bulge and bunch as much. After wearing my navy blue pants a second time, I realized I would need to make the same adjustment to them. There is a tutorial on the internet for making a more tailored version of these pants, and of course right now I can’t find it. But I want to make another pair some day (I’ve already picked out the fabric) that is a little more fitted.
My only other issue, and this happened on all the pants I made, was the flat fell seams coming lose. I had to rip out and re-sew small sections on each of the linen pairs. For the rayon pairs, since the small stitch size and delicate fabric tends to spell disaster for ripping seams, I just did a decorate stitch over the small sections that were coming apart. I did re-do one section midway down one leg that would have been really obvious with a different type of stitch. One trip through the wash and that section had pulled loose again, so I’ll be doing a decorative stitch there, too. The other place where it tended to come apart was right at the top of the pockets.
My fancy stitch repair was my way of saying, these are MY pants, I made them and I’ll fix them how I want to. The stitching is a fun little detail that makes them unique. A lot of times when I make a mistake that is visible later, I feel angry every time I see it. This time, I like the way the seam repair turned out and it makes me happy that I found a creative way of dealing with it.
Something changed for me when I started wearing and making my own clothes again this past May. Now when I wake up in the morning, I’m just as likely to wear the clothes I made as I am to wear clothes I bought. Having pants to choose from as well as tops made a big difference.
Many thanks to Three, who took all the photos of me in this post.


