
Previous post

Next post


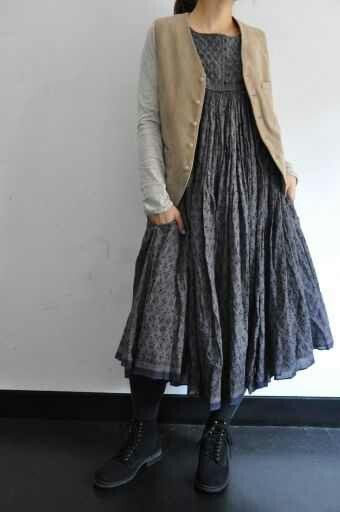
If you’ve used Pinterest, this has happened to you. You find a photo of something you love, and the image link is dead. No source, no pattern, no directions, no online store, nothing.
That’s what happened when I was making a board while doing Curated Closet, a way of streamlining your style so you can make better decisions about your wardrobe and what you add to it.
I found the pin, and put it on the inspiration board. I was sad it was a dead link, but it happens, no big deal.
Years passed. Time ticked away this summer and the Jane Austen retreat got closer, the impossible load of sewing I wanted to complete before the retreat was bearing down on me. I did what any good procrastinator does: I picked a completely unrelated project with no deadline and worked on that instead, and the Procrastination Dress came into being.
All I had to go on was a low res image of the front of the dress. I suspected because of the style that it was from a Japanese sewing book. I requested five Japanese sewing books from the library, hoping I would find it.
We won’t talk about the chances of my finding the right dress in a sample size of five books when there are likely a million Japanese sewing books, and the good ones probably haven’t even been translated into English, but suffice to say, nothing like my dress was in any of the books.  Then, I remembered that I already had a bodice that fit, and I could just shorten it and freestyle the skirt of the dress. Way easier than starting from scratch. I pulled out my Metamorphic Dress bodice and some lightweight cotton from Anuprerna from my stash.
I had made some mods to the Metamorphic Dress bodice, including rotating the shoulder straps inward. I don’t know if I threw out the original, unaltered pattern pieces, or if I kept them. When I traced the bodice for this project, I’m not sure if I traced my modified bodice or the original. This will matter later.
I added a center seam at the front and back of the bodice, so that I could do a tie closure in back, and some decorative stitching at the front. I raised the armcyes about half an inch as well. I took an inch of length out of the back bodice, and 7/8″ off the front bodice, using the lengthen/shorten line. Looking at the inspiration photo, I could have gone even a little shorter on both front and back, but this was Iteration One, so it’s probably the beginning, not the end, of the mods. The inspiration dress has a really wide neckline, with a different shape than the Metamorphic Dress, and so I altered the neckline to better match the inspiration.
There are so many variables that I’m not sure what caused the problem or why I didn’t notice it sooner. I’m really great about ignoring things like this when the rest of the project is going well. When I wore the finished dress, the straps kept falling off one shoulder.
I haven’t pulled the pattern pieces out again to find out where things went south, because that wouldn’t help. I would be mad if I used the original pieces and hadn’t noticed, and I would be mad if I used the altered pieces and they still didn’t work.  I seam ripped the center seam from the top of the front bodice to just above the waistline, and did a new seam down the center front, 5/8″ in from the original seam at the top and grading down to zero at the bottom. Then I refinished the inside, and redid all the decorative stitching.
  It fits way better now, but the scooped out neckline I was going for got sucked into the new center front seam, so it looks more like the Metamorphic Dress than it was originally supposed to.
Besides adding seams and shortening the bodice, I rotated the shoulder seams to the back. I didn’t go back far enough with the seams, but they fall behind my shoulder.  I constructed the bodice with a lining, and did the finish work by hand. I measured from the bodice to where I wanted the skirt hem. I cut two full widths of fabric at that length, gathered it, and hand sewed the skirt to the bodice.
The inspiration dress has a longer hem at the center front, which I skipped, but I did want some added detail at the hem like the original. In the original, it looks like the dress fabric had a pattern along the selvage that was used for the hem. I added a pin tuck and a couple of strips of fabric to my hem, as well as a running stitch.  For the back, I realized belatedly that with the thin fabric I was using, I’d need some interfacing around the ties to keep them from pulling the whole bodice down. I added interfacing, covered it with quilting cotton, and attached the pieces on either side of the cut-out for the tieback. I added decorative stitching to quilt the interfacing in place.
  Since I couldn’t see what the back of the inspiration dress looked like, it was fun to come up with something in keeping with the style of the dress. The tie and its decorative stitching were just the right touch.
  The one thing I don’t like about the back is how much lower the back bodice was than the front. Maybe I’ve spent so much time lately making Regency era dresses where the back bodice is shorter than the front that what “looks right” to me has been reset, but the longer back bodice wasn’t really what I was going for.
If I’d noticed, I would have shortened it. Having attached the skirt to the bodice by hand, I have very little desire to do that again, so it’s probably going to remain as it is here, a high-low hem.
It’s funny, because I can see from the inspiration photo that the skirt of my dress ought to have been fuller, and I never added pockets, but those differences don’t bother me. Just goes to show you the tricks your brain can play on you when it’s tripping on perfectionism. The dress fits great and is a 10 out of 10 for comfort. If I was trying to copy the dress in the photo, it kind of feels like a fail, but if I was just going for something lightweight and flowy inspired by the feel of the photo, then I can cut myself a break. I’ve made some notes on the pattern pieces and rotated and adjusted the seams in question, so if I come back to it, I can get even better results next time.
I’m still working on my projects for the Jane Austen retreat (which happened last month), but this dress is finished, which means procrastination IS good for something.
This is a lovely easy-to-wear dress for humid days! I loved reading about your process. The hand work you put into it makes it uniquely yours. Enjoy wearing it!
Thank you! I think writing about the process helps me file projects as “completed” in my brain.:)

2 Comments