
Previous post

Next post


I made a wearable muslin of the Seamwork Jo recently, and as soon as my eight-year-old son saw the almost-finished product, he asked for one.
I often hesitate to say yes to these requests. It’s intimidating to take an adult-sized pattern and try to make it fit a kid. Secondly, with seven kids there is a good chance several others are going to want one, too, in the name of justice. And I just can’t, most of the time, fit and make even three or four items to so many tastes and sizes.
Sometimes, one person makes a request and I do it before I can think better of it.
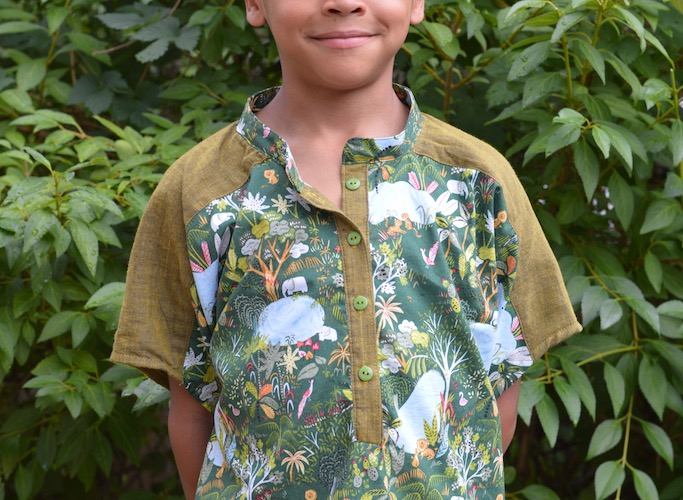
I let my son choose the fabric and the buttons for the shirt. He picked a quilting cotton. When we didn’t have quite enough fabric for the whole thing, he chose an olive khadi cotton (made from yellow and black threads woven together), which I used for the yoke and plackets. The khadi cotton is lighter weight than the quilting cotton, so it was perfect for the double layer of the yoke.  For the pattern, I used the collar, placket pieces, and yoke unaltered. I skipped the cuffs. On the front pattern piece, I removed the ease for the gathers so it would be the same width as the yoke. I did this by measuring the width of the yoke piece and then slashing and overlapping two sections of the pattern piece by about 5/8 in each.
For the back pattern piece, I removed about two inches of ease from the bottom, graded to one inch at the top. If I did it again, I would take two inches out of the entire length at the center back.
I do not enjoy cutting and taping PDF patterns like this one, so when I printed it out, I printed the bare minimum of pages to the get enough for a shirt from the top part for the front and back of the pattern.
The place where the pattern cuts off after about two pages is what I used for the length. This was completely arbitrary based on my not wanting to waste printer ink or cut and tape unnecessarily, and it was the perfect length for a kid version of the shirt.
Instead of gathers at the back, I wanted a box pleat like you’d see on a mens’ dress shirt. I only needed a couple of inches of extra fabric to do that, but I ended up with a couple more inches than that. The box pleat ended up being about twice as wide as I wanted. I wasn’t paying attention to its width because I was focused on centering it on the back of the yoke. I didn’t notice until BOTH yoke pieces were in place. At that point, there would have been too much seam ripping to fix it.
The last place I made an adjustment was under the arms. I kept the width of the sleeves the same as the pattern, and just carved out several inches out of each side under the arm to get a better fit.
I had to go back and take even more out from the under arm and side seam after the initial fitting. I would guess the final fit was 3-4 inches out of each side from both the front and back pieces (to remove 6-8 inches of ease per side). Once I got the fit right, I French-seamed the side seams. I had my son try on my size two top to see how much I needed to reduce the size.
I tacked the collar down by hand to the inside yoke because the collar topstitching didn’t catch close enough to the edge to get a clean finish. I had to do this on my own Seamwork Jo as well.
The sleeves and the bottom hem I turned over a quarter inch and then 3/8 inch. I sewed a quarter-inch seam around the bottom hem as a guide to get an even finish.
In the pattern, the placket is one of the first things you tackle. I left my buttonholes for last because I hadn’t quite decided what I wanted to do with them and I was running out of matching thread to use for the buttonholes (not that you can see the buttonhole thread on the finished product. ) I ended up using a combination of hunter green and chartreuse thread for the top stitching and buttonholes. I really like the play of all the different greens in the finished product.
The instructions for the interfacing call for the entire placket pattern piece to be lined with interfacing. For this shirt, I only lined half the length of the placket with interfacing, which gave it the body it needed, but made it easier to work with.
I’m not totally pleased with the finish for the placket. It leaves a thick tab of raw edges at the bottom inside of the placket which the sewist is instructed to finish by zigzagging.
I’ve seen a couple solutions for this, including a little fabric reinforcement triangle on the bottom of the placket like the Folkwear Victorian dress shirt pattern suggests, but this time I was in a hurry to finish the shirt before my sewing mojo ran out, so I used the instructions provided with the pattern.
I skipped the collar button, and only used four buttons on the placket (the pattern calls for five). With a kids’ shirt I liked the look of fewer, bold buttons to reduce the fuss. With the top button undone, my son can easily pull the shirt on and off over his head.
Overall, I’m really pleased with how this turned out, and so is he. It is quite roomy, perfect for a hot summer day, busy enough to hide stains, and easy to take on and off. Plus, the tonal look of the greens is kind of stupendous.
I love it!

1 Comment