
Previous post

Next post


During Me Made May, the Wiksten Shift was blowing up the internet. Well, you might rightly say, it wasn’t blowing up MY internet. And you would be right. But I follow a few fellow sewists on social media, and everyone was making and wearing this new pattern in May. And raving, raving, raving about it.
I liked that the Wiksten Shift was for woven fabrics. There were so many options with the pattern – different combinations of lengths and styles. The pattern was on back order, and I had to wait until June for it to arrive. It was the first indie pattern I’d ever bought in print rather than getting the digital version. (Indie means not Simplicity, Burda, or Butterick, the big pattern makers).
I wasn’t planning on making the dress version. I kept seeing the top with the 3/4 sleeves and really liked it.
Then one day when I was scrolling through #wikstenshift makes, I saw a fantastic photo on Insta of a woman standing on the beach in this blue shift dress. In my memory, she looked ethereal; the beach was foggy, windy, and grey, the dress glowing a rich blue.
In this post, I mention I love sewing because I can have an article of clothing in a pattern/fabric combination no one else has. But when I saw that photo on Instagram, I ordered my fabric for the same dress in the same fabric. It amazes me how our brains are willing to don rose-colored glasses, nay, beer goggles without the beer, in order to get us to click purchase.
I went back to that photo, after I’d started the dress and had run into trouble with it. It was a beautiful photo, but it wasn’t as amazing as I remembered it. Oh, how perspective can change things.
If you read my Strata top post, you might remember how I feel about facings.
The Wiksten has a facing, and it turned out fantastic when I made the dress. The instructions were clear, and pattern pieces did what they were supposed to. In fact, the whole dress came together quite nicely. There’s a gathered detail with a yoke at the back, and that went swimmingly.
I was to finish the sides of the front and back of the dress before sewing it together. Without a serger, I zigzagged the seams, which is a suggested alternative. My sewing machine chews up fabric on a zigzag stitch when the edge of the zig (zag?) is at the edge of the fabric, so I had to do the seam a little in from the edge. And it frayed like crazy. It’s still spitting out stringy cords of navy blue. But otherwise, the dress came together pretty fast without hiccups.
I only did one modification – the pattern called for the pocket pieces to be edge-finished and folded over. I know from experience I hate reaching into my pockets and getting a handful of loose threads, so instead, I cut a piece of voile out to line the inside of each pocket. I sewed around three sides, then folded down the top and edge stitched it as instructed in the pattern. Since the fabric I made the dress out of was heavier and had a little bit of give, and the voile was very lightweight with very little stretch, the lining wasn’t visible from the outside and gives the pockets a nice, finished look on the inside.
When I described some of my sewing techniques and ideas to the Chaplain, he muttered something about Steve Jobs.
I tried the dress on a couple of times while making it, and the neckline seemed a little high. I thought I could live it it, so I finished it, hoping for the best.
I tried it on after the neck was finished, a wonder of sewing beauty made up of three separate seams and miraculously, no sagging, bulging, or puckering. It looked fantastic, at least on my ironing board.
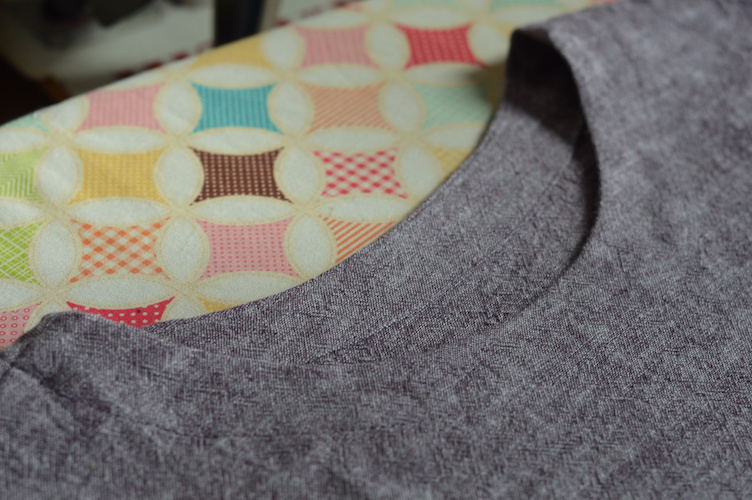
On my body, it slid backward without hesitation until the neckline was cutting into the base of my throat. See? It probably looks totally normal here, but NO. I was choking to death, even as I was smiling. I knew I would have to lower the neckline. I also knew if the whole dress was sliding back that I had a bigger problem on my hands. And that’s when I discovered the forward shoulder adjustment. I took apart the entire shoulder seam, (two seams on each side, because I used French seams), and all three of my seams on the neck facing.
The Shift Hack blog post that explains the forward shoulder adjustment on the Wiksten pattern describes how to do it on your pattern pieces before you cut them. I’d already cut everything, and had to figure out what I could do with what I had.
Fortunately, the dress is basically a huge sack, so I had some fabric to work with. With the forward shoulder adjustment, you want to shorten the front piece and lengthen the back piece so that the shoulder seam sits a little further forward on your hunched shoulders.
When I reconstructed the dress, I slid the front part of the dress up and the back piece down and sewed it together with the front piece extending a hair shy of 1 in. beyond the back piece (the 1 inch mark is just under the frayed edge of the back piece). I sewed it together with a seam 1/8 of an inch below where the back piece ended. This effectively did what was intended by the hack – made the front piece shorter, and the back piece longer, so the shoulder seam was better suited for my Quasimodo posture. I doubled over the extra fabric from the front piece and flat felled the seam toward the back. I carved the neckline out about 3/4 of an inch at the center, grading up to nothing at the sides. I tried it on, felt OK with it, and did another fantastic job with the facing. I was able to reattach the same facing again, stretching it down to match the new neckline.
When I tried on the finished dress this time, it didn’t slide back like it did before the shoulder adjustment, but the neckline still felt too high. Dang those nonalcoholic beer goggles, when I look at photos of the Wiksten shift now, I can see the neckline is right where I hate necklines to be: directly across the base of the neck.
I picked the front of the neckline out a third time. I carved out an additional 3/4 of an inch in front. This time, I had to draft a new front facing – I had pulled the neckline down too far for the original facing to fit.
Could I do another fantastic facing? THREE TIMES IN A ROW? But this time, it would actually fit me right and I wouldn’t hate it?
Yes, it turns out I could.
The dress with its sash made it look like a bathrobe on nearly everyone except the model in the pattern booklet, so initially, I skipped making the sash. After I did the shoulder adjustment, I thought the belt might take some of the weight off the shoulders so it wouldn’t be so prone to sliding back, so I made the sash after all. But every time I tried to put it on, I looked like a person from Bible times. So the first time I wore the dress, I didn’t use the sash. I don’t have any wide belts, which is the only other styling I saw on Insta besides no belt that I liked.
I wore the dress all day. I found myself reflexively adjusting it forward, but I don’t think it really needed as much adjusting as I gave it. It has so much ease that its sack-like form gives you the sense that something is wrong and must be fixed. I discovered that I cut it a little off grain. I grimace just thinking about this.
When I started making clothes again in May, when cutting pattern pieces, I would fold the fabric over in the smallest fold possible to still fit the pattern, but preserve the biggest piece of uncut fabric when I was finished, so I could use the fabric for more projects. This is a great way to save fabric, but it has its risks. Namely, that you don’t make your fold exactly on the grain (like you would if you just folded it in half and matched up the sides). I did this for all the clothes I made in the past 5 weeks, and this is the first time it came back to haunt me.
Since I wrote this, I did some research on what could cause fabric to be off-grain, and it may not have been my cutting method. Sometimes, depending on the way fabric is stored, it can get off grain before it even gets to you. So, still my mistake for not noticing in time, but maybe not my doing.
When I look back at the photos I had my son take after I first made the dress but before I fixed the shoulder and neckline, I can already see the dress pulling to the right. I didn’t really notice in earnest till I wore the dress all day. I dread thinking of the seam ripping it would take to make it right. Fortunately, the dress is so big (I made it in a size four, which was based on my bicep measurements as suggested), that I could probably rip out the sides and fix it, but that would require repositioning the pockets and a LOT of seam ripping, and I don’t know if I have it in me. 
I did end up attempting to fix the problem, using this tutorial. Now it pulls a tiny bit to the OTHER side, which means I overcorrected. The repair didn’t take as long as I feared, though, and it’s definitely better than it was. I have yet to wear the altered dress all day again to see how much the fix helped.
My last complaint? The fabric I made the dress with. I used the same type of fabric, Brussels Washer, for two pairs of pants. They were very crunchy when I finished them, so I soaked them in a baking soda bath for 24 hours, did a drain and spin in the washer, and threw them in the dryer with all the dryer balls. They softened right up. This dress was not responsive to the same treatment. I love the yarn-dyed color, but it feels very rough even after two trips through the wash and the baking soda bath. I hope with time it will soften up, but that will require me wearing it and getting it dirty enough to wash, or me washing it extra, neither of which are super appealing.
Now, the Wiksten Shift Top, which first drew me to this pattern, was a different story. I made the dress, knew I had big problems, and set it aside so I could cool my head. I cut the pieces for the top one night, and completed the shirt the next day.
Since I had already learned about the shoulder adjustment, I was able to do it ahead of time with the top. I used French seams for the arms and shoulder seams, and bound the side seams after sewing them together with Snug Hug Binding Tape. Before finishing the neckline, I lowered it 3/4 of an inch at the front center and graded it out. I skipped the front pockets because I didn’t like how they looked. I lengthened the hem a little – the instructions have you folding it over twice at 1.25 inches, I did half that for my first fold to give myself an extra 3/4 inch of length.
Since I used French seams on the sleeves rather than following the instructions, which called for a bigger seam allowance where the sleeve attaches to the rest of the top, my sleeves ended up being a little longer, which I like. The sleeves also start a little lower, and I’m not sure if I love that. If I made it again, I might shorten the part where the 3/4 sleeve attaches in order to fix that.
The shirt has a ton of ease, especially in back. Although I am satisfied with this version, when I make another I want to take some of that extra fabric out of the back. After you’ve been pregnant seven times, wearing clothes that make you look wider in the middle aren’t very appealing. Don’t want to start any rumors.
I used the exact same fabric, Brussells Washer (this time in heliotrope), for the top as I did for the dress. Unlike the dress, the top is impossibly soft after just one pre-wash of the fabric. It is so dreamy that I wore it two days in a row after I made it, which is maybe why it’s looking so rumpled in the pic, which was taken on the second day. I love this shirt. I love the color, the style, and how comfortable it is. For all the trouble with the dress, if what I learned resulted in this top, it was probably worth it. I plan to eventually make 2-3 more – I already have a white viscose linen and some Nano Iro double gauze in my stash picked out as possible contenders. If I could fix the issue of the blue fabric being scratchy, I might try one in the same fabric I used for the dress. Heck, maybe I could make the dress into a top and skirt, and then I would actually wear it.
While I was working to fix the dress, I was reading up on another pattern I wanted to come back to, the Gemma tank. I read a post about someone making the hacked version I want to try and all the problems she encountered while making it. She’s an experienced sewist. It was just a reminder that sewing is always a learning experience, and even when you know what you are doing, there are pitfalls.
It was encouraging to see someone else’s process. It helped to know I wasn’t alone in the seam-ripping and trouble shooting.
