
Previous post

Next post


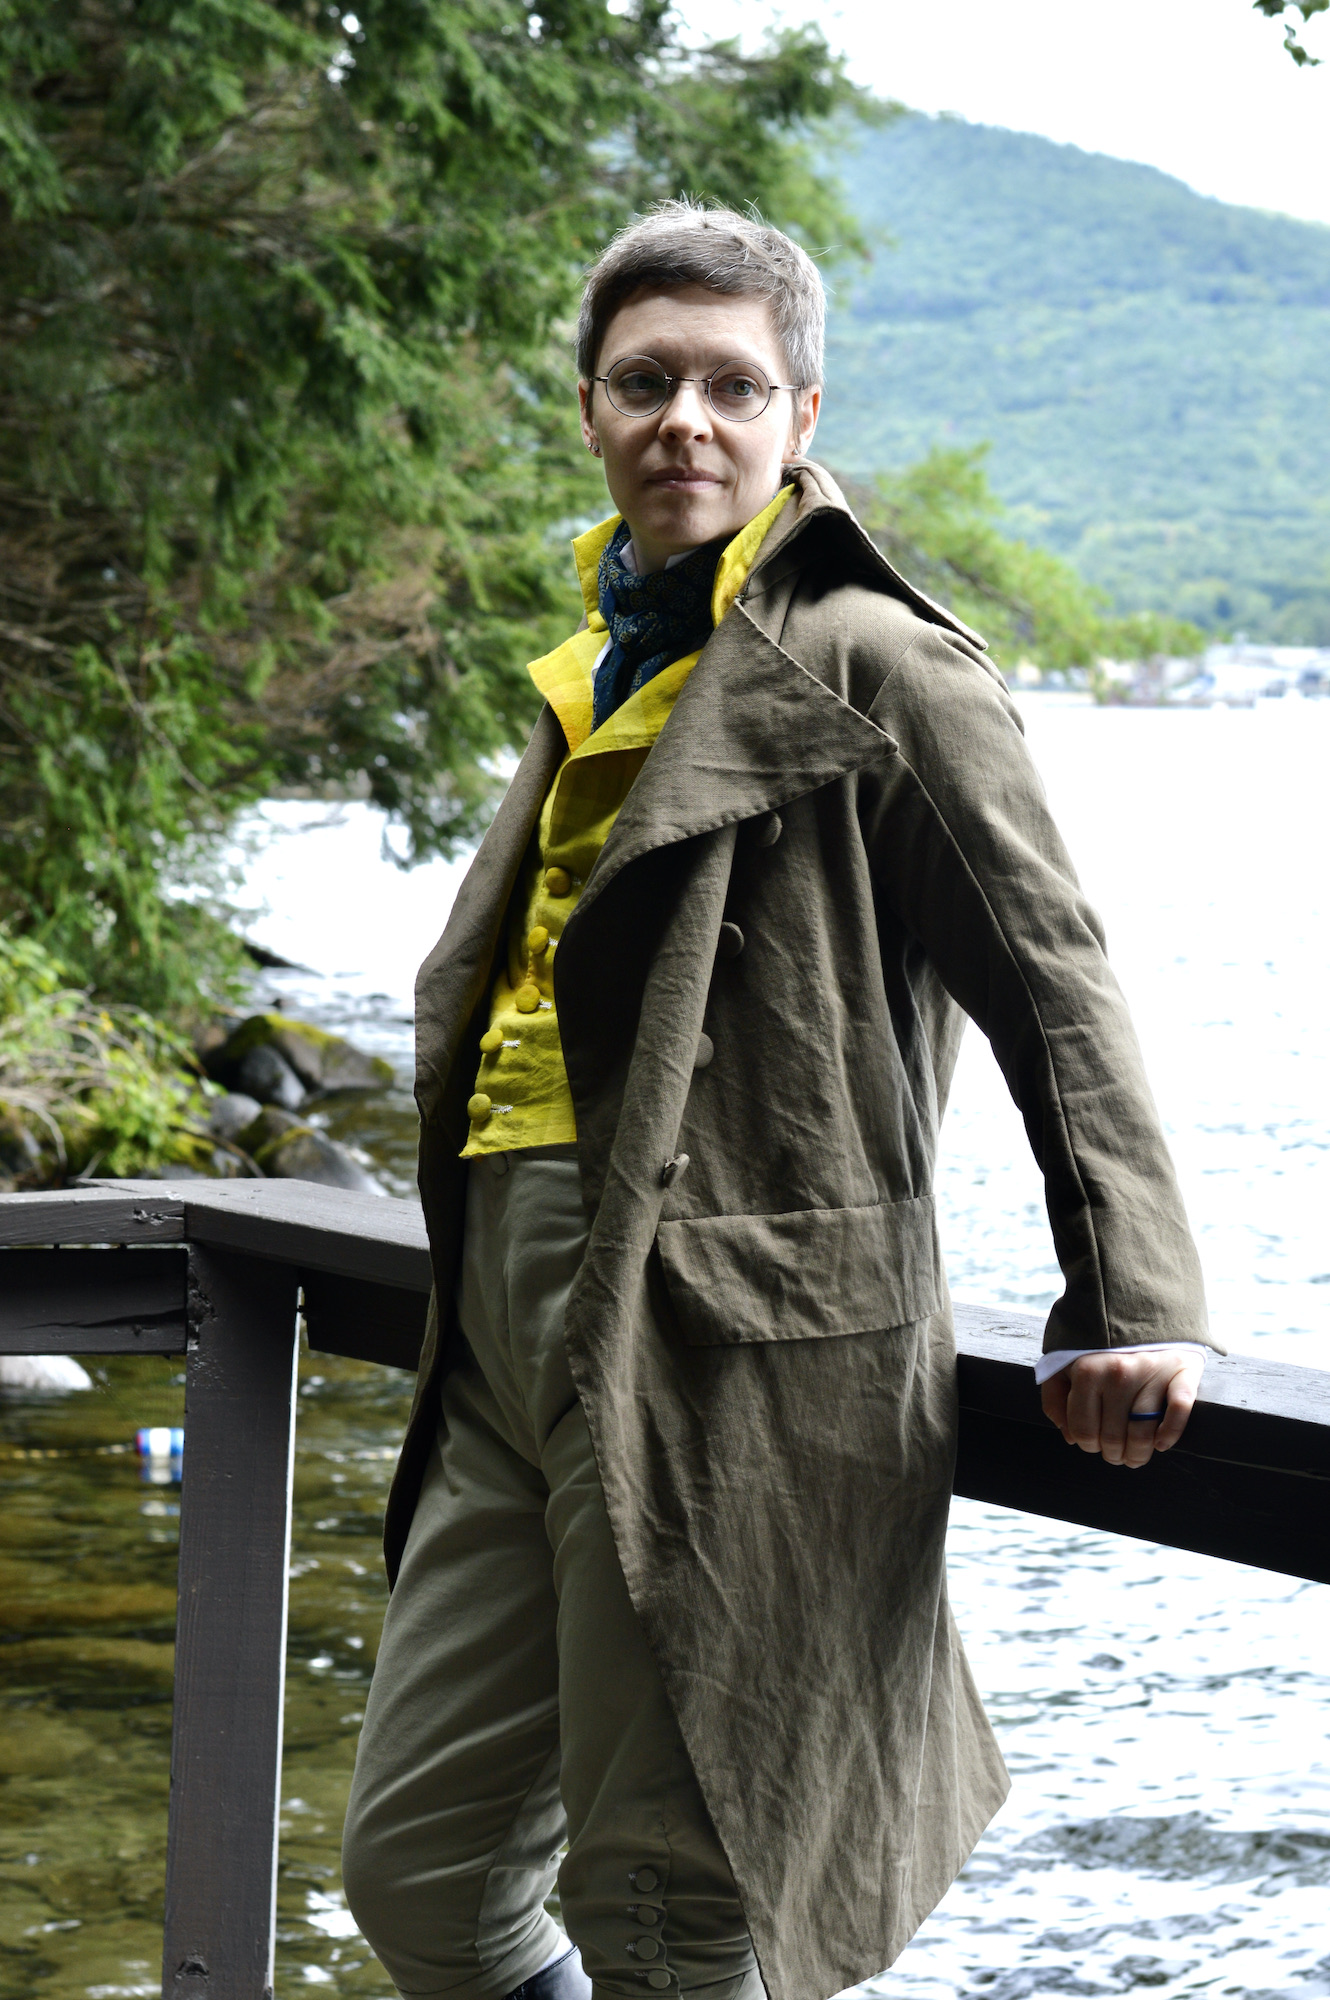
I spent most of my time getting my costume ready for Day 2. This was the day of the ball, and I wanted to go as a Regency Gent (ok, I wanted to go as a rake. A cad. A rogue).
Menswear is a whole different box of worms. I still have a lot to learn, but I had so much fun making and wearing this outfit.
The first thing I made was the waistcoat. I’ve already made a waistcoat for my partner, so I wasn’t going in totally blind like I would be for other parts of the outfit.  I picked a beautiful plaid fabric (from the now sadly discontinued Alison Glass Kaleidoscope line) which felt perfect for the look I was going for. It set the color palette for the rest of my outfit. I used the same pattern I used for my partner’s waistcoat, Kannik’s Korner Mans’ Waistcoats Single-Breasted, c. 1790-1815, KK-4202.
I cut a size 36 but had to take it in significantly at the side and shoulder seams to get a good fit. The lapel pad stitching left something to be desired, so they don’t always sit right. I’m still learning that skill. My welt pockets, however, are boss.
I lined the front of the vest with linen, but the back is a single layer of the white linen I used for the front lining. Last year the Jane Austen retreat weekend had 90 degree days and I sweated through my costume every day. I was hoping to keep things as light and breathable as possible. Fortunately, this year had much more moderate temperatures. I used one of the many online tutorials for my 18th c. mens’ shirt, and sewed it up with white handkerchief linen, one of my absolute favorite fibers. I hand sewed the parts you can see, and French seamed everything else.
I may eventually replace the collar with a taller one, because I really like the Regency look with the neckstock and two little collar points sticking out at the top, and my shorter collar couldn’t really do that – at least, it wouldn’t stay that way. I saved the shirt for one of my last projects before the retreat, so it was definitely a rush job. The collar and cuffs still need closures, but safety pins sufficed over the weekend and I’ll get to it eventually.
For my neck stock, I did a couple of different looks, the blue neckerchief is one I use for 18th c. women’s wear, and the white stock I made for my partner last year.  The breeches were a project. I started with Reconstructing History 812 1770’s-1790’s Fall Front Breeches. I read a lot online and knew they needed to be tight, but I’m also at a weird place with my body and really didn’t want them to be THAT tight. So I made them fitted but not skin tight, and they may get a little more work in the future. I used a khaki cotton twill and left them unlined, other than the front flap, which is lined with a natural linen from scavenged from a shirt from Goodwill.
I don’t have a package to accommodate, so the front center seam had to be taken in a lot, and I had to make a number of other adjustments to accommodate my anatomy, mostly taking them in everywhere so they would fit properly.  My favorite part is all the buttons, although it made going to the bathroom a process. I used white silk buttonhole thread and fabric covered buttons, and they look really nice.
While I was at the retreat, I ended up taking the waistline in by 2 inches with a quick and dirty graded tuck on each side of the waistband midway through the day.
I’ve been using a weighted hula for about a month now, and I’ve lost about an inch at my waist since I started making the breeches. Great for me, not great for fitting clothes “just so.” The back of the breeches have a lace-up closure, so with the tighter waistline, I’ll still have some leeway to fluctuate. For now, the alteration made them fit much better.
A week before the retreat, time was getting tight and I didn’t know if I was going to have time for a coat. Then I found a fashion plate that depicted the look I wanted: I don’t have a source for this person, but they have some killer style. Look at those lapels! I liked the double waistcoat look, although there wasn’t time to make a second waistcoat for this event. I also really liked that the coat had just one buttonhole, without sacrificing style.
I purchased some army green cotton canvas the previous week. I didn’t even know if it would arrive in time for me to do something with it, but I hoped to use it for the coat. I didn’t have coat experience, so I wasn’t comfortable cutting into a more valuable fabric like linen or wool. I guess you could call this a wearable mock-up.
The other bonus of using canvas is that it’s stiff enough to mostly hold its shape. If I used linen that it would need a lot of support in a lot of places, and I didn’t have time for pad stitching.  I used Reconstructing History 804 Mens’ 1790’s-1810’s Frock Coat for the body of the jacket. The original pattern has the cutaway front typical of the period, but I like the coats from a little earlier than that, so I drew the front of the pattern straight down instead of scooping it out. I had to adjust it at the hem later to get it to hang at the angle I wanted.
For the pocket flaps, I modified the pattern piece from Reconstructing History 803, the 1780’s Frock Coat pattern. The pockets were a last minute add-on. I’d skipped pockets on the breeches and knew I’d need a pocket somewhere.  The pocket instructions included with the pattern were the PITS. I couldn’t make heads or tails of them. I ended up doing them wrong (Looking back, I would probably have gotten better results using the welt pocket instructions from the waistcoat).
I had to do some reinforcement patching under the pocket flaps to prevent gaping and cover my mistake. The second pocket is slightly better than the first, but they both had major issues. For the pockets themselves, I used some green linen I had on hand. I was leaving the coat unlined and didn’t want them to show when the coat was unbuttoned.
The other modification I made to the original pattern was extend the lapels big time. I ended up removing some of what I added later, so they would be in better proportion, but they are still big and flappy.
For my sleeves, I just borrowed the sleeve from Reconstructing History 101 Women’s 1630’s Bodice and Petticote. I had already used them for my Tudor jacket for the Ren Faire, so I knew it fit, and it had the shape I was looking for. The sleeves actually fit perfectly in the sleeve holes, with a little gathering stitch on the back half to ease them in.  If I had it to do again, I might’ve have made the sleeves a little longer, but other than that the fit is really good. I suppose adding a cuff would lengthen them without completely starting over.
I traced a size 40 for the Frock Coat pattern based on my hip measurement, but I ought to have gone smaller, because I had to take it in significantly everywhere. I left the center back of the coat’s skirt open, and just did whatever for the back pleats because the pattern instructions didn’t say what to do. The inside of the coat is a hot mess, and I used this photo from the internet to figure out how to configure the back of the coat from the outside. (See below, a dead end Pinterest photo): I made a front facing deep enough to accommodate the decorative buttons. I used rainbow thread to baste the coat together, and hand sewed the facing down as well as hand hemming the sleeves and hem. It’s still basted because I didn’t have time to go back and reinforce the seams with smaller stitches. With such thick fabric, it doesn’t seem to matter that much.
I did prick stitching on the collar, the pocket flaps, and the front opening of the coat, for structure and for looks. The collar still needs a little more help, and I’ll probably add some more stitching to the lower part for more strength.
I’ve seen other versions of the coat worn with the collar up or down, and I wanted that flexibility, but it needs to be strong enough to do the vertical part, and right now, it won’t stay that way. I covered wooden buttons I had on hand with self fabric. I eyeballed the placement while wearing the coat, making chalk marks for reference, then tacked them on. Despite the slapdash method, the button placement was just what I wanted. I used some olive sashiko thread for the button hole.
I started it Monday and finished it Friday. At the retreat, my friend A sat with me on the screen porch and helped me finish off the pockets.
The last bit was a pair of leather riding boots I got on Poshmark for $25. The good news? The leather and the price. The bad news? At Regency Dance class Saturday morning, both heel soles fell right off. I’ll have to find a cobbler to fix them. One cracked completely and I never found one of the pieces.  Fortunately, I had a pair of pointy flats which still worked for the look – see the above fashion plate – so I wore those for the rest of the day.
I had ordered a straw top hat, but that didn’t arrive in time (because I ordered it late). A friend who was also dressing as a dandy lent me hers for some of the photo shoots. I used stockings I already had.
One issue I had was visible underwear lines. I meant to bring boxer briefs and forgot. I want to make a pair of woven underwear to wear with the costume so I don’t have to worry about that for next time.
Overall, though? I am so excited about how this turned out. It was super fun to wear, comfortable, and I laughed more that day than any other. The Regency Ball Saturday evening was especially fun. We did traditional dances from the period, and like always, I struggled with rights, lefts, and pretty much everything else about the choreographed dancing. But when we got it right, it was really incredible to see everyone bouncing and turning together.
The top hat arrived while I was away at the retreat, so I’ll be getting that ready to go and doing a few more finishing touches so the next time I have a chance to be a dashing Regency gent, I’ll have a lot less work to do.


