
Previous post

Next post


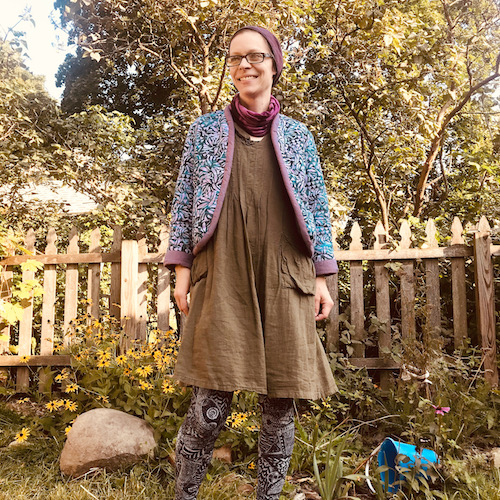
The Ayora Jacket by Pauline Alice Patterns is a labor of love.
I traced a straight size 38. It was my intention to do a high round back adjustment when I cut the final pattern pieces after quilting (I completely forgot and it didn’t matter). I cut my three layers (inner layer, batting, outer layer) out with a full two inches extra all the way around each piece, which is the maximum amount suggested, so that any shrinkage that took place would still allow me the room I needed to cut out my pieces.
For the inner layer, an iridescent khadi cotton. It’s a lightweight weave that came out of the wash super soft, and has fibers of periwinkle blue and bright orange which together appear a dusky purple. The outer layer is a turquoise and pink batik (my favorite source for batik quilting cotton) that matches perfectly.
I hand-basted my layers together and deliberated for a long time about what pattern to use for quilting the jacket.
I free handed my quilting pattern with chalk, heavily inspired by Sarah Jane Makes. Her Ayora jacket also features a sunburst landscape on the back. For the pockets and sleeves, I did a series of arcing lines that intersected each other. I started machine quilting. I’m trying to work from my sewing stash, so I used a variety of tonal pinks and purple threads I had on hand. Naturally, I ran into tension issues with my machine.
I’ve been hand sewing so much lately between mending my kids’ clothes and historical costuming that it seemed easier to start quilting by hand than fix my sewing machine’s problems. Since most of the threads I’d used up until then were poly or poly cotton, I broke down and went to pick up some matching cotton quilting thread for the hand sewing bit.  After I had traced the original pattern piece with the two inches extra onto my fabric, I remembered that I wanted rotate the shoulder seam in the back, like I did with my quilted vest.
I like the back shoulder seam as a design element, but I’m a bit neurotic about where my shoulder seams fall because of my posture. I hate clothes that are constantly choking me due to fit issues, and when the shoulder seam is too far forward or back it’s kind of a reminder of my perceived “shortcomings:”
I have sloping shoulders and a bit of a back hump. So did both of my grandmothers. I accept it, but for a long time, I thought it was a personal failing of not sitting up straight enough. That might have been a contributing factor, but as I recently learned, scientists have discovered time travel without paradoxes is theoretically possible.
According to the article, if someone went back in time to, say, prevent a pandemic, the pandemic would still happen, just not in the way it originally would have (thwarted by the time traveler). So I theorize that even if I had gone back in time to my teenage self and found a way to get her to sit up straight without damaging her self esteem, she still would have ended up a slouch, because that was HER DESTINY. But I digress. Long story short, because I gave myself way more extra fabric around the pattern pieces than I needed for my size and the quilt pile, I was able to rotate the seams anyway and still fit the main pattern piece onto my quilted fabric without even having to piece anything. (I took photos of the process of rotating the seam, but they are so bad that it’s difficult to see what I did. You overlap the seam allowances of pattern pieces at the shoulder, tape it, draw and cut the seam where you want it, and add the seam allowance back.)
When I look at where the shoulder seam is, I think, I could have taken it back even further, but if I had it would have required piecing, which I didn’t feel like doing.
I saw a lot of photos with people putting their hands in the pockets from the top and thought that felt a bit awkward, so like the quilted vest I made, I sewed the pockets to open from the side. This meant making them narrower so I wouldn’t have to reach to my back to get my hand in the pockets. Even taking off about an inch of width, I probably could still have gone a full inch narrower to prevent carpal tunnel. Instead of finishing the seams with bias tape, I folded them open and flat felled them for contrasting seams on the “inside” of the jacket. The batik pattern of the “outside” layer obscures the quilting pattern, so when I wear it inside out, the contrasting seams and quilting get to shine.
My highest praise of the pattern is that I have never inserted a sleeve that went in so smoothly or fit so perfectly on the first try.  I hand finished the sleeve facings, and planned to cut my facing on the bias instead of cutting out the facing pieces included with the pattern, which other people had already complained about. The facing pattern pieces included felt really wasteful (They are narrow and L-shaped, which in my mind is worse than self-made bias tape).
I made the cardinal mistake of starting the facings late in the day when I was fried. I didn’t remember to interface or stay stitch the facing before attaching it to the jacket. I did the stay stitching after the fact, which probably defeated the purpose. Once I started attaching the second (interfaced) part of the facing, I saw that any hope of getting it to gracefully curve like the photos of the pattern from the website was a lost cause.  I’m not even sure interfacing the first part of the facing would have completely solved the problem. The curve at the bottom of the jacket is a tough one to navigate, and wrestling with the stay stitching was like trying to get an agoraphobe to go outside. I ultimately trimmed the front lower edge curves to be more rounded in order to make it easier to get the facing to lie right.
My solution: A lot of seam ripping, followed by re-attaching one strip of facing, lined with a layer of interfacing, then a layer of batting. I rolled it under so that the finished border is a chunky one inch all the way around. I hand whipped it down on the inside of the jacket.  I’m a bit of a sucker for reversible clothing (you can see my Metamorphic dresses here and here). I also have a reversible shirt on my sewing bucket list. Yet whenever I make something reversible, there’s a clear winner – one side of the clothing that I pick again and again, often wearing the other side “just to even things out” or sometimes not at all. This is the first time I’ve made a reversible item that I honestly don’t know which side I like better.
This jacket is beautiful and cozy and I have worn it every cool day since I made it, but it’s not something you need more than one of, so I don’t know if I’ll ever work out my facing problems.
