
Previous post


I’ve made some serious progress on my 1740’s Outlander Cosplay. I’ve worn it two ways: as a straight-up costume, and for history bounding.
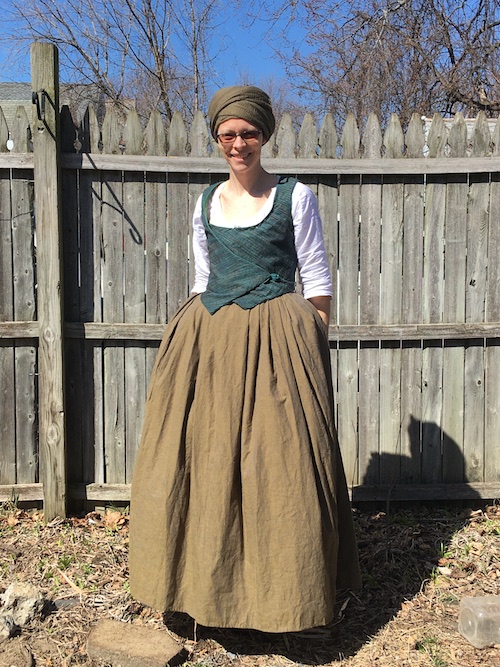
The bodice is made with ikat fabric in teal, gold, and red. I used teal peppered cotton for the piping around the edges. A shell button holds it closed in front. I machine-sewed everything until I had completed the lining and the outside of the bodice, then whipped the lining in by hand. I steamed the seams so they would lay flat instead of rolling outward.  After the first try with the neckline (above), I scooped it out a little more so it would be closer to Claire’s bodice in the show. The pink skirt I’m wearing was hand-sewn from a 100% cotton sheet and it was intended as a practice/under-petticoat.
When I was making the bodice, I did a high round back/forward shoulder adjustment. Eighteenth century shoulder seams fall on the back of the garment. When I added more ease in back for my posture, I think I forgot to take away some of the ease in the front.  Whenever I’m doing something (like typing, leaning forward, or slouching even a little), the front of the bodice gapes open and the back rides forward. In order for it to lay straight, I have to be sitting or standing up pretty straight, which isn’t really my M.O. It’s less of an issue when I wear the bodice with my 18th century stays, which holds my body straight.
My goal was to make clothes to fit my body, not clothes I would have to be artificially stiff in. If I made another bodice in a different color, I would probably try to fix this issue, but it may be one of those perfectionist things that will bother me less as time goes on.
The outer petticoat I made using a little over 3 yards of Kaffe Fassett shot cotton in pewter. It’s an olive green with gold and blue highlights and it’s beautiful. I hand-sewed the petticoat from start to finish so that I can use it for future historical costume ventures. I probably cut the hem a little lower than is strictly fashionable for the time, but there are a couple of fashion trends from the 1700’s that I’m still trying to digest, including the high water hem lengths. Also, based on historic portraits and looking at other costumers, it seems like hem length varies a LOT and I’m hoping I just fall somewhere on the bell curve.
Besides the questionable hems, there are the dopey mob caps. Which brings me to my next phase, accessories.
My goal was to add an apron, a cap, and possibly a jacket, all made with historically accurate techniques as much as possible. I want to be able to use the accessories for other costumes.
My first effort was a cap, which I made using the instructions in the American Duchess 18th Century Guide to Dressmaking. The book provides a pattern on a 1-inch grid that I copied and enlarged by hand to make my cap. Somewhere in this process, something went awry. The caul (back piece) and the band (middle piece) were way too small, while the ruffle seemed just right… at least, the second time I tried to cut and stitch it.
When I gathered the ruffle to fit the brim I’d made, nothing looked right, and the way the cap perched on the back of my head looks so bad there was no redeeming it. That’s a shame, since I spent hours hand sewing it with my tiniest stitches ever. Here it is on my 6-year-old, because it looked so bad on me there was just no way to photograph it: This is my first time scaling up a pattern from a book. There’s also the point that I don’t have any hair. Either or both of these potential problems could have contributed to the demented baby bonnet that I ended up with. (I think the style itself is problematic, too, but that’s something I can’t change.)
I’m in the process of making a new one (I plan to re-use the ruffle, which was by far the most time consuming part to sew). I scaled it up by slashing and spreading the pattern pieces. I may end up in a Goldilocks situation where the second one is an over-correction and I’ll have to make a third one to get it Just Right, but I’ll cross that bridge when I come to it.
Meanwhile, this article helped me know I got the fabric right (white handkerchief linen), and that there is a pretty wide range of normal for the style. Another blogger showed the wide range of types of caps. Of course, just like today, people didn’t all wear exactly the same thing, which gives me some creative license to figure out a way to make a cap that doesn’t look stupid. I know I have to make mistakes in this process, but it’s a little more frustrating to make those mistakes by hand.
I have a beautiful piece of off-white linen and fun red tape, (and regular off white linen tape if the red doesn’t work out), for the apron I’ll be making. I feel pretty comfortable with the apron project and hope it will be an easy win while I work out the cap issues.Here’s the costume accessorized for #historybounding with a knit neck warmer, and black knit mitts.  Instead of the bum roll I wore in the other photos, this time I just put the outer petticoat over my quilted petticoat to reduce bulk without taking away all the oomph. Instead of a shift and stays, I wore an A-shirt under a black knit t-shirt. I’ve got pantaloons and a modern slip on for warmth and to keep the skirts from bunching.
 When the snow really got going today, I added a coat I found at the thrift shop for $4. It reminds me more of 17th century than 18th century, but history bounding is history bounding, right?

I’ve enjoyed trying different ways of wearing the costume pieces since that was the goal all along, to find ways to wear costuming stuff in everyday life.

