Previous post
Next post

I want to wear Victorian or Edwardian costume with the right silhouette, but I’m not feeling the frills of the time period. The imaginary event I’m thinking of as I plan this costume is an Anne of Green Gables-type outdoor picnic setting.
It still amazes me with costuming how much time is spent making underwear. Here’s a quick round-up of my progress for this era, which I’m counting as a twofer since with some modifications, the things I’m making should work for the later part of the 19th century into the beginning of the 20th.
Bust Improver: Inspired by the extant examples and photos from Amelia Marie and Atelier Nostalgia. I used white broadcloth and a combination of machine and hand sewing. The surprise for me is how big the fake boobs needed to be to get the proportions right: each of the circles I cut out were 8.25 in. across.
I did a tiny hem around each circle, then gathered the circles half an inch in from the edge with a running stitch, and filled the pocket the gathers created with cotton batting. I didn’t have loose fill, just quilting batting, so I cut pieces to fill in the space. I kept the stuffing pretty loose. For the base, I drew the shape and then held it up to myself to figure out how wide it needed to be. Mine is 13.5 in. wide and 7 in. tall in the center (Actual Bust: 34″). I cut two base pieces out, sewed them right sides together and flipped it so all the raw edges were inside. I whipped the edge closed and then whipped the falsies on through both layers.
Corset: Edwardian and Victorian silhouettes require different types of corsets. I have a couple of RTW corsets I got from Timeless Trends, an underbust and an overbust, neither of which is technically historically accurate, but I plan to use those as a base layer to create a firm, smooth silhouette I can pad out and hang the clothes on.
The overbust corset I have has cups that are too big and not quite the right shape (they remind me of the protrusions on the sides of strawberry planters, or the figurehead at the bow of a ship). I’m still working my way up to cutting into them, reducing the size, and sewing them back up again. I’m sure I can do it, but I’d have to put the corset on and take it off again multiple times, which right now sounds terrible. I’m waiting till I’m in the mood (and maybe until it’s a little warmer.)
I’m interested in trying some menswear for women looks, and that means I can worry less about the curves and just work on getting the tailoring details right for my natural shape.
Split drawers: There are a number of patterns and instructions on the internet for split drawers and Victorian and Edwardian undergarments. This defense split drawers is very convincing. I used Melly Sews Free Pajama Shorts Pattern mashed up with the split drawers from Victorian Garment Patterns to loosely draft a single pattern piece for the split drawers.
I didn’t take into account how low the rise was, and added a 3 inch. strip of fabric to the top of the drawers later. I’m still not sure the rise is completely right, but as a person who normally pulls my pants down before using the bathroom, this is new territory for me.
I made the drawers with white cotton batiste. The legs are French seamed closed. I made the legs too long and hemmed them early, so I “had” to keep adding pin tucks … rather than cut the excess fabric off and re-hem them by hand. I like the end result, but the drawers are fancier than I had planned. In between one row of pin tucks, I added a feathering stitch with champagne colored silk thread. I drafted and sewed on facings for the open crotch seams – apparently doing this makes wearing the drawers more comfortable (Wedgie Prevention).
I drafted my waistband for a finished width of 3/4 in., cut with a couple of inches of ease lengthwise so I would have some room to play with if I messed anything up. It’s lined with a strip of white broadcloth.
I used pins to mark each quarter of the waistband when I attached it to the drawers. The drawers aren’t gathered at the front to lessen bulk. The waistband is sewn on with a 3/8 inch seam allowance, then whipped down the inside edge with the seam allowance tucked into the waistband.  Some drawers’ center seams are sewn together several inches down from the top. One PDF I read suggested overlapping the tops of the leg pieces for less drafts. Most drawers I saw buttoned in the back, but I have pain issues, so I’d rather not have to reach anywhere unnecessarily to get my clothes secured. (This is where a lady’s maid would have come in handy.)
My pair overlaps in the back by about three inches, sewn down the width of the strip of fabric I added. In the front, it overlaps by about two inches and closes with a shell button and a hook and eye at the inside of the front overlap. That’s where the extra waistband length came in handy. I took the drawers for a test drive with some harem pants to see how they were for all day use. Since the harem pants are closed at the bottom there would be no test driving their functionality, just comfort.
By afternoon I was missing elastic in the waistband. Over the course of the day, my waistband, which fit fine in the morning, started to feel tight. The space between my ribs and the top of my hipbone is pretty small, so the place the waistband had to “ride” comfortably was limited. I had to unbutton them around 3 p.m. Otherwise, they kept my legs warm and were very comfortable. I might add a second button to give me some room to grow/slouch.
Of course, if I were wearing these with a corset, this would be a non-issue since my waist would be kept at a consistent size all day. I have another pair of drawers without an open crotch that have an elastic waist – they might be the best choice for history bounding days. I LIKE these though, so I’m hoping to find a solution that makes them wearable beyond costuming. Ideas are welcome.
Shift: Shifts for this time period are fancy and sleeveless. I made an ultra plain linen shift to use as a summer nightgown, and that’s what I plan to use.  It’s a little worn because since I made it I’ve used it a LOT. There is nothing like sleeping in linen. I may never go back to anything else.
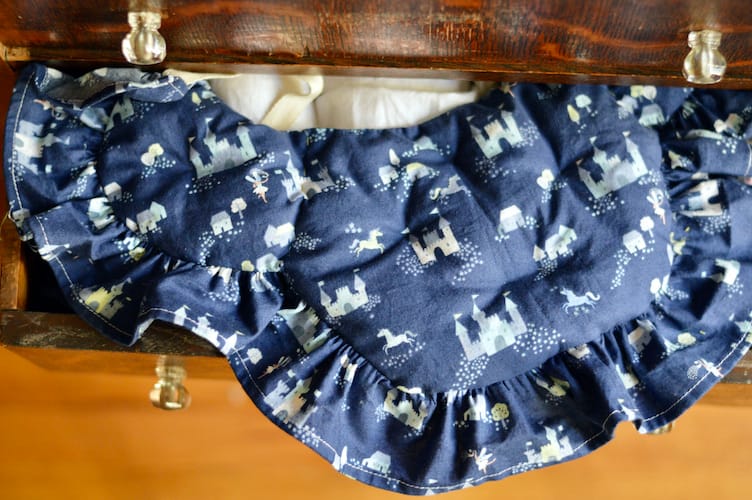
 Bum Pad: The padding for this period around the hips and butt is to make one’s waist look smaller in comparison. The difference from the 18th century is that the padding isn’t as ridiculous.
I’d already cut out pieces and hemmed the ruffle for a mini bum pad for my younger daughter’s 18th century costume. I used the Simplicity 8162 pattern, scaled down. I left the ruffle the same width, but shortened the ruffle length in proportion to the smaller size. My daughter didn’t want a bum pad, so the project lay in my sewing basket for months. When I was researching Edwardian underclothes, the smaller pad seemed like just what I needed.
I made it flatter than my 18th century bum pads. I tacked it down with scattered little stitches to hold the padding in place similar to what I’d seen with other Edwardian “enhancements.” It was satisfying to come back to a project already started and skip all the mental and emotional labor of starting from scratch.
Next up, a corset cover and a petticoat before I move onto the outer layers in earnest.


